
How to decorate a wedding tent: start with the structure
Turn the exact tent, supplier scope, weather setup, and approved layout into a layered wedding decor plan without treating inspiration as permission.
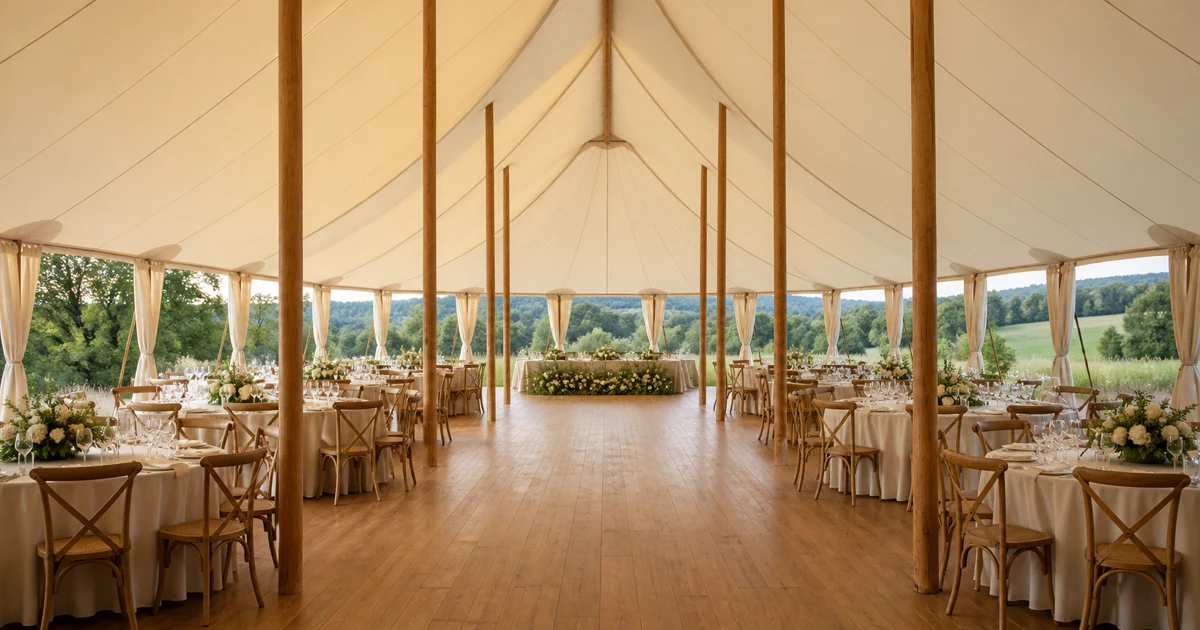
Decorate a wedding tent by locking the structure and supplier scope before choosing the styling. Record the tent type, poles, sidewalls, floor, entrances, exits, supplied lighting and power, weather configuration, and approved attachment points. Keep the confirmed layout intact, then add decor in layers: use the tent’s own character, define the perimeter and floor, style the tables, choose one or two focal zones, and add overhead work only when the responsible supplier and venue have approved it.
This order keeps a useful inspiration image from becoming an installation assumption. Two white tents can have different frames, floors, views, sidewall plans, power, access, and supplier rules. The chandelier, liner, or pole treatment that works in one may have no place in the other. Start with the temporary room you have actually hired.
Start with the tent, not the decorations
A tent is part shelter, part venue, and part visible design. Its canopy, poles, frame, openings, floor, and surrounding view are already in the room. Some of those features may deserve emphasis. Others may need a quiet supporting treatment. None should be designed from a photograph of a different structure.
The Knot’s current wedding tent decor guide shows the range of visual directions couples encounter: sailcloth and clear-top tents, exposed or decorated poles, open views, liners, drape, lighting, flowers, furniture, and entrance treatments. It also includes examples where the tent and landscape do most of the visual work.
Use that gallery as vocabulary, not as a specification. Before keeping an idea, ask which part of your confirmed tent it depends on and who is responsible for making that part real.
If you still need to decide where dining, dancing, drinks, speeches, service, and quieter seating will happen, use the blank-canvas wedding venue method first. This guide begins once the main event zones exist.
Complete a structure-and-supplier worksheet
Ask the tent supplier and venue for the current proposal, layout, equipment list, and approval process. Do not collapse every answer into “the tent is included.” Record each part separately.
| Part of the plan | What to record | Why decor depends on it |
|---|---|---|
| Tent and canopy | Tent type, roof or canopy, frame or poles, liner, and any supplier-installed drape | Establishes the visible structure and whether it already supplies enough character |
| Sidewalls and openings | Which sides can open or close, doors, views, and planned weather configuration | Changes the perimeter, entrance treatment, light, views, and usable edges |
| Floor and thresholds | Supplied floor, carpet, staging, ramps, transitions, and unresolved surface questions | Affects furniture, rugs, floor-supported pieces, movement, and installation sequence |
| Layout and routes | Confirmed tables, chairs, stage, bar, dance floor, entrances, exits, aisles, and service routes | Shows which areas decor must leave alone and which focal zones already exist |
| Lighting and power | Supplied fixtures, controls, operator, power source, distribution, cable plan, and backup | Separates the existing system from optional decorative lighting |
| Weather equipment | Heating, cooling, ventilation, sidewall changes, and the responsible operator | Reveals which decorative choices depend on one weather configuration |
| Attachments | Approved points, prohibited surfaces, responsible designer, installer, and review documents | Keeps hanging, pole-adjacent, liner, and frame ideas on hold until they have a real method |
| Timing and ownership | Delivery, installation, inspection, room-ready time, removal, collection, and named owners | Turns a selected idea into work that fits the event schedule |
Use three labels for every row: confirmed, unresolved, or not applicable. An empty cell is unresolved, not implied permission.
The worksheet is an editorial planning tool. It does not choose a tent, calculate capacity or egress, inspect anchors, set wind limits, design power, determine fire requirements, specify installation, or replace supplier documents and local approval.
Protect the layout and weather plan
Treat the approved tent layout as an input to the decor plan, not a rough suggestion to improve later. Mark the guest entrances, exits, aisles, service routes, catering area, entertainment equipment, and any clear zones identified by the people responsible for the event. Keep decorative objects out of those spaces unless an updated plan is reviewed and approved.
Compare the fair-weather and bad-weather configurations next. Sidewalls may change the view, perimeter, airflow, entrances, equipment plan, and visual weight of the tent. A design that depends on an open landscape can fall apart when the sides close. A treatment fixed to a particular opening may conflict with the weather plan.
For every idea near an opening, sidewall, floor edge, power route, pole, or frame, add one line: “What changes when the weather setup changes?” Send that question to the responsible supplier. If the answer is unknown, use a fallback that works inside the confirmed configuration.
Choose the decor in layers
Once the worksheet is usable, build from the tent outward. You do not need an object in every layer.
Let the tent keep its own character
Begin with what is already worth seeing. A sailcloth canopy, clear roof, repeated pole line, open garden edge, finished floor, or supplier-installed liner can carry a large part of the design. Choose one or two useful qualities and repeat them in the decor. A warm timber pole might connect with chairs or table details. An open green view might justify a quieter perimeter.
This reduces the number of competing visual decisions. It also keeps the tent from looking like a room that has been covered by another room.
Make the perimeter readable
Decide how guests find the entrance and how the inside relates to the site. One clear entrance treatment can do more work than decorating every side. Low, floor-supported pieces may repeat around the perimeter where the approved plan allows them. Strong views can remain open.
Do not assume that fabric, greenery, lights, signs, or flowers can attach to a sidewall, pole, frame, or canopy. Ask the tent supplier about the exact item, position, method, installer, weather configuration, setup, and removal. “It is only lightweight” is not an approval method.
Use the floor and furniture to define zones
Furniture already gives the tent a plan. Tables establish dining. A dance floor creates a center. A bar or stage can anchor an edge. Lounge furniture can make one corner intentional without adding a wall treatment above it.
Add floor-supported decor only where it strengthens a real zone. Record its footprint, supplier, placement owner, movement plan, and removal owner. Freestanding does not mean automatically suitable; the venue and suppliers responsible for the space still need the real proposal.
Repeat one restrained table language
Tables occupy much of the guest view, so repetition at table level can make the whole tent feel deliberate. Choose a clear material, color, flower direction, textile, arrangement shape, or permitted light and repeat it with enough variation to suit the table plan.
Keep service and guest use in the physical review. A photograph cannot tell you whether a centerpiece, lamp, menu, glass, and shared dish fit together on the real table. The rental, catering, floral, lighting, and venue teams may each own a different part of that answer.
Give one or two zones more visual weight
Choose the moment that should hold attention. It may be the couple’s table, the dance floor, a band or DJ area, the entrance, or a view beyond the tent. Concentrate the strongest treatment there, then let the rest of the decor support it.
This prevents every pole, table, doorway, and ceiling bay from competing. If the tent still feels visually empty after the floor, furniture, tables, and focal zones are resolved, use the high-ceiling wedding venue guide to decide whether the room needs grounding or a stronger vertical connection.
Make overhead decor optional
Ceiling drape, liners, flowers, chandeliers, pendants, and string lights are common in tent inspiration. They are not the starting point. First ask what the supplier already includes and whether the lower layers solve the visual problem.
If an overhead idea remains, give the tent supplier the exact item, location, proposed supplier, and visual job. Ask who designs the method, provides the equipment, installs it, reviews it, powers it when relevant, and removes it. Keep a complete floor-and-table fallback until that scope is approved.
For lighting choices, use the wedding reception lighting guide to name the visual job before asking a supplier for fixtures. It will not turn a decorative preference into an electrical or installation plan, but it will make the request less vague.
Turn each idea into a supplier handoff
An idea belongs in the final plan only when it has a location, owner, timing, and fallback.
| Handoff field | What to record |
|---|---|
| Visual job | The exact area or problem the idea is meant to address |
| Location | Marked position on the current supplier or venue layout |
| Dependencies | Tent component, sidewall setting, floor, power, light, weather configuration, or other approved scope it relies on |
| Approval | Venue, tent supplier, landowner, authority, or other party whose written decision is needed |
| Installation | Supplier, method, equipment, access, sequence, and documents requested by the responsible parties |
| Timing | Delivery, installation, inspection, room-ready time, removal, and collection |
| Fallback | The confirmed decor direction used if the item, attachment, weather setup, power, or timing is declined |
| Decision record | Date, decision, conditions, owner, and attached plan or message |
For broader questions about attachment, flame, power, access, labor, inventory, cleanup, outdoors, and written approval, use the wedding venue decor restrictions checklist.
Treat permit and fire rules as local
Temporary structures may sit inside a local permit and safety process. The details depend on the site, jurisdiction, event, and approved plan, so a general article cannot give you the rule set.
Portland Fire & Rescue’s outdoor tent guide is one useful example. For events covered by Portland’s process, its floor-plan requirements include the interior setup, table spacing, aisles, and exits. The page also sets Portland-specific requirements for permits, flame resistance, exits, heaters, ignition sources, support lines, and the surrounding site.
Those requirements belong to Portland. Do not copy its thresholds, dimensions, equipment, or restrictions into a plan elsewhere, and do not assume every Portland event follows the same path without checking. Ask the authority responsible for your actual event what applies, then keep the approved documents beside the venue and tent-supplier plan. Decor should follow that record.
Where NuptiaAI fits
NuptiaAI is an iPhone wedding-venue visualizer. You can submit a venue photo with style, colors, event details, season, time, budget tier, flowers, and special requests.
Use a photo of the installed tent or a supplier-representative interior only after the worksheet has narrowed the plan. Compare broad directions while keeping the same source image. For example, test a design that leaves the canopy and poles visible against one that adds stronger floor and table layers. Put confirmed constraints in the special request, then inspect whether the result changed a pole, sidewall, floor, entrance, exit, light, attachment, or furniture layout.
Treat the image as a concept. NuptiaAI cannot choose or specify the tent, produce a measured floor plan, verify capacity or egress, inspect anchoring, determine wind limits, plan power or weather readiness, approve an attachment, specify installation, obtain a permit, or grant venue or local approval. Take the selected visual direction back to the responsible suppliers and approvers.
Frequently asked questions
How do you make a wedding tent look elegant?
Use the tent’s strongest existing feature, repeat a restrained table language, and concentrate the most detailed treatment in one or two focal zones. Elegance does not require hiding every pole or filling the ceiling. A clear hierarchy usually looks more deliberate than equal decoration on every surface.
How can you decorate wedding tent poles?
First ask the tent supplier whether the specific pole may receive the proposed item, how it would be attached, who may install it, and what changes when sidewalls or weather equipment are used. If approval is missing, leave the pole visible or use an approved floor-supported treatment nearby without blocking routes or supplier access.
Do you need to decorate the ceiling of a wedding tent?
No. Finish the floor, furniture, tables, perimeter, and focal zones first. The canopy, liner, frame, or supplied lighting may already give the room enough overhead character. Keep ceiling decor only when it solves a named visual problem and the responsible suppliers have approved the real design, method, access, power, timing, and removal.
What decor works in a clear wedding tent?
Start with the view and the changing light because they are already major parts of the room. Compare a quieter perimeter and table plan with one stronger focal treatment. Ask the tent and lighting suppliers how daylight, darkness, reflections, sidewalls, weather equipment, and the installed system affect the real proposal. A daytime inspiration image does not settle the evening setup.
Should a wedding tent plan change for bad weather?
The operational plan may change, and the decor must tolerate the approved configuration. Confirm who decides on sidewalls and weather equipment, when that decision happens, and which entrances, views, lights, power routes, or decorative pieces change with it. Keep a documented fallback that works without an unresolved attachment or open side.
Use the NuptiaAI wedding decor guides to compare the visual direction, then keep the selected concept beside the confirmed tent worksheet and supplier handoff.